Thursday, April 23, 2015

Increase the JVM Heap Size/Java Memory On Windows

1 . Go to Control Panel ---->  Open Java  Settings---->
2 . In Java Settings ----> Select tab Java ---->
3 . Change amount of heap.In "Runtime Parameters" column change the value (like -Xms512m)
or if it is blank decide for the new value, of the Java memory.
                                       OR
You can also try adding Java Memory through the Environment Properties
  1. Right-click My Computer ---> Properties ---> Advanced System Settings --->
           System Properties ---> Environment Variables
     2.   Add a new variable name and value.
                For variable name enter JAVA_OPTS for variable value enter JAVA_OPTS=-Xms256m -Xmx512m

Add a 3 TB HDD on Windows 7/8 Machine OR Initialize / Convert the a HDD in to GPT Partition Style

                                 The GUID Partition Table (GPT) was introduced as a part of the Unified Extensible Firmware Interface (UEFI). GPT provides more options than the traditional MBR partitioning method that is common in PCs. If you have a large-sized Hard Drive, then you could want to convert MBR to GPT. This is because, MBR disks support only four partition table entries. If  one wants more partitions, then one needs to create a secondary structure known as an extended partition.
                                   So for any hard drive over 2TB, we need to use GPT partition. If you have a disk larger than 2TB size, the rest of the disk space will not be used unless you convert it to GPT.
1. Physically / Virtually  add a HDD a 3 TB
2. Open Control Panel ----> Administrative Tools ----> Computer Management ----> Disk Management
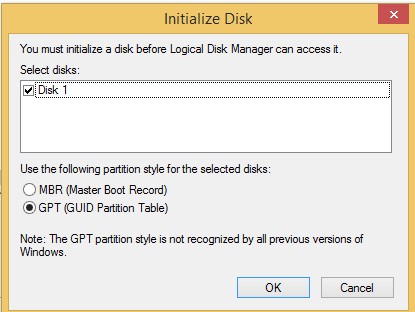
3. If its a newly added HDD, its automatically get Windows like below Select GPT
                         OR
5. If it already added HDD and Initialized up to 2TB and the remaining 1 TB is unallocated
    Select the disk (Eg:-disk1)----> right click on each Partition / Volume ---->  Delete Volume
6 . Right click on the disk (ex: Disk 1) that you want to convert to a GPT disk, and click on Convert to GPT Disk.

Tuesday, April 21, 2015

Creating A Partition Size Larger Than 2TB In Ubuntu Server

                                    Normally we cannot create a Linux partition larger than 2 TB using the fdisk command. The fdisk won't create partitions larger than 2 TB.
                                    To solve this problem use GNU parted command with GPT. It supports Intel EFI/GPT partition tables. Partition Table (GPT) is a standard for the layout of the partition table on a physical hard disk. It is a part of the Extensible Firmware Interface (EFI) standard proposed by Intel as a replacement for the outdated PC BIOS, one of the few remaining relics of the original IBM PC. EFI uses GPT where BIOS uses a Master Boot Record (MBR).
                                     Also note that booting from a GPT volume requires support in your BIOS / firmware. This is not supported on non-EFI platforms.
           Legacy BIOS mode = MBR partition required
           UEFI BIOS mode = GPT partition required for Windows (some Linux versions support GPT boot under legacy BIOS with hybrid MBR)
                                    A master boot record (MBR) is a special type of boot sector holds the information on how the logical partitions, containing file systems, are organized on that medium.This MBR code is usually referred to as a boot loader.
                                  The organization of the partition table in the MBR limits the maximum addressable storage space of a disk to 2 TiB (232 × 512 bytes).Therefore, the MBR-based partitioning scheme is in the process of being superseded by the GUID Partition Table (GPT) scheme in new computers. A GPT can coexist with an MBR in order to provide some limited form of backward compatibility for older systems.
1. Find Out Hard Disks Specification :-
root@ubuntu:~# lshw -class disk
 *-disk:0
      description: SCSI Disk
      physical id: 0.0.0
      bus info: scsi@32:0.0.0
      logical name: /dev/sda
      size: 20GiB (21GB)
      capabilities: partitioned partitioned:dos
      configuration: sectorsize=512 signature=000afad3
 *-disk:1
      description: SCSI Disk
      physical id: 0.1.0
      bus info: scsi@32:0.1.0
      logical name: /dev/sdb
      size: 3000GiB (3221GB)
      configuration: sectorsize=512
2. Find Out Newly added HDD detailed Information
root@ubuntu:~# fdisk -l /dev/sdb
Disk /dev/sdb: 3221.2 GB, 3221225472000 bytes
255 heads, 63 sectors/track, 391625 cylinders, total 6291456000 sectors
Units = sectors of 1 * 512 = 512 bytes
Sector size (logical/physical): 512 bytes / 512 bytes
I/O size (minimum/optimal): 512 bytes / 512 bytes
Disk identifier: 0x00000000
Disk /dev/sdb doesn't contain a valid partition table
Partition And Format HDD - 3TB gpart File System
1 . Start GNU parted
root@ubuntu:~# parted /dev/sdb
GNU Parted 2.3
Using /dev/sdb
Welcome to GNU Parted! Type 'help' to view a list of commands.
(parted)
2 . Creates a new GPT disk label - Partition table
(parted) mklabel gpt
(parted)
3 . Set the Default unit to TB
(parted) unit TB
4 . Create a 3TB Partition Size
(parted) mkpart primary 0 0
OR
(parted) mkpart primary 0.00TB 3.00TB
5 . Print the Current Partitions
(parted) print
Model: VMware, VMware Virtual S (scsi)
Disk /dev/sdb: 3.22TB
Sector size (logical/physical): 512B/512B
Partition Table: gpt
Number  Start   End     Size    File system  Name     Flags
1      0.00TB  3.22TB  3.22TB               primary
6 . Quit and save the changes
(parted) quit
Information: You may need to update /etc/fstab
7. Check the HDD Information on partitioning
root@ubuntu:~# fdisk -l /dev/sdb
WARNING: GPT (GUID Partition Table) detected on '/dev/sdb'! The util fdisk doesn't support GPT. Use GNU Parted.
Disk /dev/sdb: 3221.2 GB, 3221225472000 bytes
255 heads, 63 sectors/track, 391625 cylinders, total 6291456000 sectors
Units = sectors of 1 * 512 = 512 bytes
Sector size (logical/physical): 512 bytes / 512 bytes
I/O size (minimum/optimal): 512 bytes / 512 bytes
Disk identifier: 0x00000000
Device Boot      Start         End      Blocks   Id  System
/dev/sdb1               1  4294967295  2147483647+  ee  GPT
7 . Format the HDD Partition with valid file system
root@ubuntu:~# mkfs.ext3 /dev/sdb1
OR
root@ubuntu:~# mkfs.ext4 /dev/sdb1
8 . Mount the HDD Partition into path /ictops
root@ubuntu:~# mkdir /ictops
root@ubuntu:~# mount /dev/sdb1 /ictops
9 . List Disk partition Information
root@ubuntu:~# df -H
Filesystem                   Size  Used Avail Use% Mounted on
/dev/mapper/ubuntu--vg-root   18G  1.2G   16G   7% /
none                         4.0K     0  4.0K   0% /sys/fs/cgroup
udev                         983M  4.0K  983M   1% /dev
tmpfs                        199M  612K  199M   1% /run
none                         5.0M     0  5.0M   0% /run/lock
none                         994M     0  994M   0% /run/shm
none                         100M     0  100M   0% /run/user
/dev/sda1                    236M   37M  188M  17% /boot
/dev/sdb1                    2.9T   72M  2.8T   1% /ictops

Thursday, April 16, 2015

Disable Strong Password Enforcement And Password Aging

                                          By default Microsoft Windows Server 2012 enforces users in the Administrators group to use strong passwords. Home users often just want to create their own passwords or leave them blank.
      1. Open Start ---> Administrative Tools ---> Local Security Policy ---> Account Policies
                   ---> Password Policy.
       2. In the right pane of Password Policy double click Password must meet complexity requirements   
            and set it to Disabled.
For enabling the Password never expire :-
          Open the Maximum password age policy and set set the value to 0. Click OK to apply the change.

Thursday, March 19, 2015

Cloning a VM Using VMware vSphere Client

                VMware vSphere is the most robust virtualization solution. Cloning a Virtual Machine in ESxi 5.x is a feature of vCenter server. Out of the box vSphere free edition hypervisor does not support cloning. But there is an alternative way to clone a VM.
  1. First connect to the ESXi using the vSphere client and power off the source VM.
  2. In vSphere client User Interface.Select the Configuration tab and Storage settings on the left menu. The Datastores list will come up on the right pane.
vSphere Datastores
     3. Right click on the datastore of the source VM and select Browse.
     4. Right click on the root folder on the left tree and Create a new folder.
     5. Select the source folder of the VM,which one we want to clone
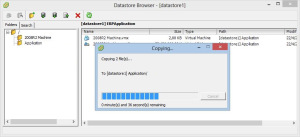
     6  Copy the configuration file (.vmx) and the virtual disk file (.vmdk) Copying the files
 7. Paste the copied files into the destination folder,new folder
 8. In the destination folder select .vmx file and Add to Inventory.
 9. Enter the name of the cloned VM and finish the wizard.

Clone A VMware’s VM Without vCenter in ESXi 5.x-Using VMKFS

                                           I herewith show the procedure by cloning a VM Server/snapshot of a VM.We have already option for taking Snapshots of a VM in VSphere client.
For taking snapshot via VSphere client :- Right click the vVM ---> Make a snapshot
For taking Clone follow the steps
  1. Shutdown the VM otherwise the files will be locked.
  2. Connect the ESXi host via Putty and Browse the Datastore and check the VM Server location
#cd /vmfs/volumes/datstore name
     3.   List the items in the location
/vmfs/volumes/50e7090a-87ed9a0d-9b18-0026b95833b7#ls
     4.   Enter in to the location, which is allocated for the VM and list the items
/vmfs/volumes/50e7090a-87ed9a0d-9b18-0026b95833b7/SVR-1#ls
                                       As you can see now, there are more than one vmdk disk files, the flat vmdk, the delta vmdk and the vmdk descriptor file (the Xp3-000001.vmdk file in our example), along with the memory snapshot and various control and log files.
    For taking Clone Via vmkfstool command line Syntax :-
vmkfstools -i source_path destination_path -d disk_format -a adapter_type
If you didn’t have a snapshot, the source file would be the vmdk descriptor file of your vm
     5.   Create the destination folder in datastore folder
/vmfs/volumes/50e7090a-87ed9a0d-9b18-0026b95833b7/SVR-1 # mkdir SVR-2
     6.   Clone the disk file - In the case of Snapshot
vmkfstools -i /vmfs/volumes/220/SVR-1/vmsvr-1-000001.vmdk /vmfs/volumes/220/SVR-2/vmsvr-2.vmdk -d thin
     7.   Clone the disk file - No snapshot-take direct machine clone
vmkfstools -i /vmfs/volumes/220/SVR-1/vmsvr-1.vmdk /vmfs/volumes/220/SVR-2/vmsvr-2.vmdk -d thin
    8. Create a new vm and force the use of an existing disk file via VSphere client
Eg:-
Based i have a VM machine named “vmsvr-1” located in datastore.Datastore name is 220
Here i have clone my vmsvr-1 machine to a new vmsvr-2 VM and loaded into SVR-2 folder
  1. Login into the ESXi host and check the item in machine placed location                                    
                      #cd /vmfs/volumes/220/
                     /vmfs/volumes/50e7090a-87ed9a0d-9b18-0026b95833b7/SVR-1#ls
vmsvr-1-flat.vmdk  vmware-11.log
vmsvr-1.nvram      vmware-12.log
vmsvr-1.vmdk       vmware-13.log
vmsvr-1.vmsd       vmware-8.log
vmsvr-1.vmx        vmware-9.log
vmsvr-1.vmxf       vmware.log
vmware-10.log
  1. Clone the disk file - No snapshot-take direct machine clone
vmkfstools -i /vmfs/volumes/220/SVR-1/vmsvr-1.vmdk /vmfs/volumes/220/SVR-2/vmsvr-2.vmdk -d thin
After you enter the above command it shows a message to start the cloning process
Destination disk format: VMFS thin-provisioned
Cloning disk '/vmfs/volumes/220/SVR-1/vmsvr-1.vmdk'...
Clone: 10% done.
Clone: 100% done.
  1. Check the SVR-2 folder location after the cloning process
                    /vmfs/volumes/50e7090a-87ed9a0d-9b18-0026b95833b7/SVR-2 #ls
vmsvr2-flat.vmdk  vmsvr2.vmdk
  1. Create a new vm and force the use of an existing disk file (vmsvr-2.vmdk) via VSphere client
bloggerwidgets