Friday, August 22, 2014

Create NFS Datastore For ESX in WIn Server 2K8 R2

                             Services for NFS, is used to integrate Unix and Linux hosts with Windows Servers, allowing those hosts to share files. It can connect the Windows Server to an NFS share (could be another server or a NAS) as a client, but Services for NFS can also make the Windows Server into an NFS server. In other words, it can turn your Windows Server into a NFS Network Attached Storage NAS device.
Add the Services for NFS
            1. From your Windows host, run Server Manager.
2. Click on Roles and then on Add Role.
3. Click to add the File Services Role.
4. Under Role Services click to add Services for Network File System. Click Next and Install.
Crete Folder and Set NFS Permissions
                         Create a new Windows folder and share it using NFS (which has different permissions than Windows). Right-click on that folder and click on Properties. You'll see a new tab called NFS Sharing.
NFS Sharing tab.
1. Click on the NFS Share Permissions button
2. Checked to allow all machines Read-Write and root access.
3. Checked to "enable unmapped user access." From there, click OK and OK.
4. Give everyone full control in the NTFS permissions.
Mount Shared folder into the vSphere
In the vSphere Client, go to the ESXi host you want to connect and to the Configuration tab, then to Storage.
  1. Click to Add Storage and add a Network File System.
  2. Enter the Server name (via IP or DNS name), NFS Share name and a new name that you specify for the new NFS datastore.
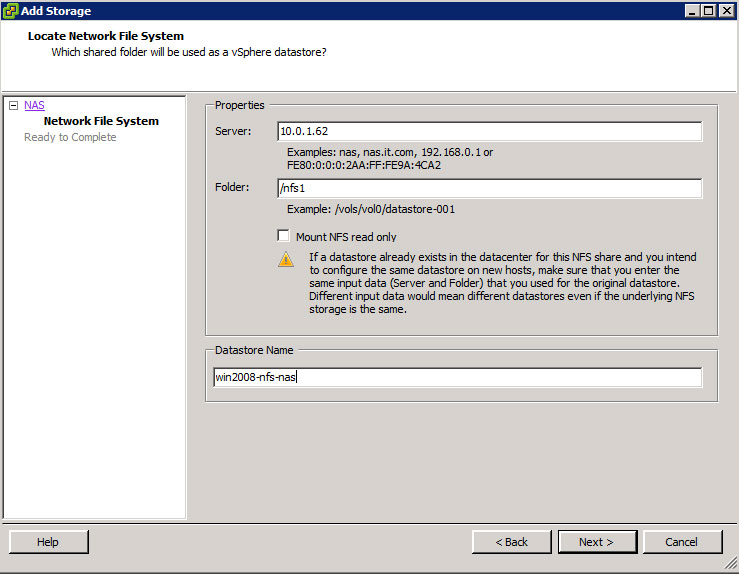
Connecting vSphere to NFS NAS.

Clear The Terminal Command History

                               By default, up to the last 500 command lines a user types in the terminal window are saved into a hidden .bash_history file. The previously typed commands can be readily accessed by using the up and down arrow keys.
Viewing the complete terminal command
               To view the complete history of commands typed in the terminal "for the logged in user" 
        Open a terminal window and type   history
Clear the terminal command line history:
  1. Login with the user account whose terminal history you plan to clear
  2. Open a terminal window and type history -c

Thursday, August 21, 2014

Samba Server Configuration In Ubuntu 14.04 LTS-Secured Samba Sharing Server

                                Samba is an Open Source/Free Software suite that provides seamless file and print services to SMB/CIFS clients. Samba is freely available, unlike other SMB/CIFS implementations, and allows for interoperability between Linux/Unix servers and Windows-based clients.
                               SMB, which stands for Server Message Block, is a protocol for sharing files, printers, serial ports, and communications abstractions such as named pipes and mailslots between computer
 
Secured Samba Sharing Server
Ubuntu SAMBA Server
1. Install the samba
apt-get install samba samba-common python-glade2 system-config-samba
2. Create a group “smbgrp” & user “jagan” to access the samba server with proper authentication
root@server1:~#addgroup smbgrp
root@server1:~#adduser jagan -G smbgrp
root@server1:~# smbpasswd -a jagan
New SMB password:
Retype new SMB password:
Added user jagan
3. Create the folder viz secured in the /samba folder & give permissions like this
root@server1:~#mkdir -p /var/samba/secured
root@server1:~#cd /var/samba
root@server1:~#chmod -R 0770 secured/
4. Edit the configuration file as : (Add at the end of the file )
vi /etc/samba/smb.conf
[secured]
path = /var/samba/secured
valid users = @smbgrp
guest ok = no
writable = yes
browsable = yes
5. Restart the Samba services to enable the new configuration:  
service smbd restart
service nmbd restart
Client Windows Machine
                         Now at windows machine check the folder now with the proper credentials.You will again face the issue of permissions to give write permission to the user jagan do
Modified the Permissions in Samba Server
cd /var/samba/
            chown -R jagan:smbgrp secured/

Samba Server Configuration in Ubuntu 14.04 LTS-Anonymous Samba Sharing

                                Samba is an Open Source/Free Software suite that provides seamless file and print services to SMB/CIFS clients. Samba is freely available, unlike other SMB/CIFS implementations, and allows for interoperability between Linux/Unix servers and Windows-based clients.
                               SMB, which stands for Server Message Block, is a protocol for sharing files, printers, serial ports, and communications abstractions such as named pipes and mailslots between computer
 
Anonymous Samba Sharing
Ubuntu SAMBA Server
1. Install the samba with the anonymous sharing
apt-get install samba samba-common python-glade2 system-config-samba
2. Configure samba edit the file /etc/samba/smb.cnf
3. Before making changes take backup of original file mv /etc/samba/smb.cnf /etc/samba/smb.cnf.bak
4. Edit /etc/samba/smb.cnf
vi /etc/samba/smb.cnf
[global]
workgroup = WORKGROUP
server string = Samba Server %v
netbios name = ubuntu
security = user
map to guest = bad user
dns proxy = no
#============================ Share Definitions ==============================
[Anonymous]
path = /var/samba/anonymous
browsable =yes
writable = yes
guest ok = yes
5. Create directory for Sharing Location
mkdir -p /var/samba/anonymous
6. Restart the Samba services to enable the new configuration:  
service smbd restart
service nmbd restart
Client Windows Machine
                         From windows machine just browse the folder & try to create a text file, but you will get an error of permission denied.
                           In Run :- \\SAMBA Server IP
Modified the Permissions in Samba Server
1. Check the permission for the shared folder.
root@server1:~# ls -l /var/samba/anonymous
        total 4
drwxr-xr-x 2 root root 4096 May 27 18:17 anonymous
2. Allow anonymous user give the permissions as follows;
root@server1:~# cd /var/samba/
root@server1:/var/samba# chmod -R 0755 anonymous/
root@server1:# chown -R nobody:nogroup anonymous/
root@server1:/var/samba# ls -l
total 4
drwx-xr-x 2 nobody nogroup root 4096 May 27 18:17 anonymous
Additional Notes:- Normally In smb.conf we have append the following details: Eg:-
[share]
   comment = Ubuntu File Server Share
   path = /var/samba/jagan
   browsable = yes
   guest ok = yes
   read only = no
   create mask = 0755
*******************************************************************************************************
comment: a short description of the share. Adjust to fit your needs.
path: the path to the directory to share.
browsable: enables Windows clients to browse the shared directory using Windows Explorer.
guest ok: allows clients to connect to the share without supplying a password.
read only: determines if the share is read only.Write privileges are allowed only when the value is no, as is seen in this example. If the value is yes, then access to the share is read only.
create mask: determines the permissions new files will have when created.

Monday, August 18, 2014

MAC Installation On VMware ESXi 5.5

1. Downloaded the  Unlocker the unlock-all-v110
2. Close all virtual machines and Disconnect the Esxi from a V Center
3. Copy the unlock-all-v110   to ESXi datastore (Using SCP or Winscp )
4. Copy the file into the location (vmfs/volumes/datastore1)
5. Check via Putty
    Like
           #/vmfs/volumes/5295d25d-12a4e9de-e0c9-c81f660660cd # ls
                                   unlock-all-v110
6. Switch to Directory
           #/vmfs/volumes/5295d25d-12a4e9de-e0c9-c81f660660cd/unlock-all-v110/esxi
          #/vmfs/volumes/5295d25d-12a4e9de-e0c9-c81f660660cd/unlock-all-v110/esxi # ls               
Unlocker.ESXi    bin            install.sh     uninstall.sh
Note :  Many unlocker doesn't contained  bin directory,if its not installtion is not completed properly

7. In your Terminal #
      # ./install.sh
8. Sometimes it shows Permissions error
9. So Execute the following line
               # chmod +x *   
10.         # ./install.sh
11. After the installation completed the Restarted the ESxi Host machine
12. Create VM - Start the Installation
13. Sometimes Installation don’t start from MAC ISO file already loaded in Datastore.So Select the ISO files from Local HDD,where the Vshereclient is running.

Show And Hide Drives Using Registry

1. Go to Windows registry Editor.Navigate to the following path:
        HKEY_CURRENT_USER\Software\Microsoft\Windows\CurrentVersion\Policies\Explorer
2. In the right-pane, create a new Binary entry "NoDrives"
3. Enter the corresponding binary value - 03ffffff
4. Save and restart Windows.
                                   OR
1. Create two test files and rename it into .reg extension.Like show.reg and hide.reg
2. For Hiding Edit the hide.reg file and paste the below mentioned code in to it
REGEDIT4
[HKEY_LOCAL_MACHINE\Software\Microsoft\Windows\CurrentVersion\Policies\Explorer]
"NoDrives"=dword:03ffffff

3. Save and Restart/Logoff Machine.
4. For Showing the hidden drives, edit the show.reg file and paste the below mentioned code in to it
REGEDIT4
[HKEY_LOCAL_MACHINE\Software\Microsoft\Windows\CurrentVersion\Policies\Explorer]
"NoDrives"=dword:00000000

5. Save and Restart/Logoff Machine

Saturday, August 16, 2014

MAC Installation On VMware Workstation

                                   Installing MAC OSX on VMware Platform (Both Vmware Workstation and ESXi), we need to install/patch the vmware using vmware unlocker.The unlocker utility replaces few VMware program files to be able to install and run latest MAC OS X guests.
1. Downloaded the Unlocker the unlock-all-v110
2. Close all virtual machines and VMware
3. Install the unlock-all-v110\windows\install
 If any issue as been occurred install via command prompt
4. After Completing the steps
5. Launch Vmware workstation - Create New VM
6. After the successful installation of Unlocker, we got the Apple Platform Options on Vmware Console. Like
 

Its has an option for Apple MAC OS X
 

6. For the first installation time HDD not formatted.So format it in MAC file Sysytem
7. Take Utilities  ---->  Disk Utility ----> Select Disk ----> Erase  ---->
8. In Erase Tab Select Format : Mac OS Extended (Journaled)
9. Start Installation 
bloggerwidgets