Monday, November 9, 2015

Transferring FSMO Roles In Windows Server 2008

                                           One of the crucial steps required to successfully migrate your domain controller, is to be able to successfully transfer the FSMO roles to the new server. FSMO stands for Flexible Single Master Operations, and in a forest there are at least five roles.
                                            Here, I will be showing you how to transfer the FSMO in Windows Server 2008 - (It's an Additional DC) from my existing Windows 2003 Server.The five FSMO roles are:
  1. Schema Master
  2. Domain Naming Master
  3. Infrastructure Master
  4. Relative ID (RID) Master
  5. PDC Emulator
The FSMO roles are going to be transferred, using the following three MMC snap-ins :
    Active Directory Schema snap-in  : Will be used to transfer the Schema Master role
    Active Directory Domains and Trusts snap-in : Will be used to transfer the Domain Naming Master role
    Active Directory Users and Computers snap-in : Will be used to transfer the RID Master, PDC Emulator, and Infrastructure Master roles
                Transferring Schema Master Role
                                Using AD Schema snap-in to transfer the Schema Master role
  1. Register schmmgmt.dll in order to be able to use the Active Directory Schema snap-in
    Click Start > Run >  Type  regsvr32 schmmgmt.dll
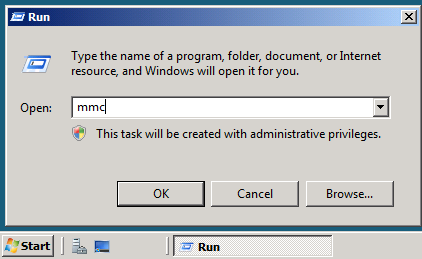
  2.  Click Start > Run, type mmc, then click OK
3.       Click File > then click Add/Remove Snap-in...
                     From the left side, under Available Snap-ins, click on Active Directory Schema, then click Add > and then click OK
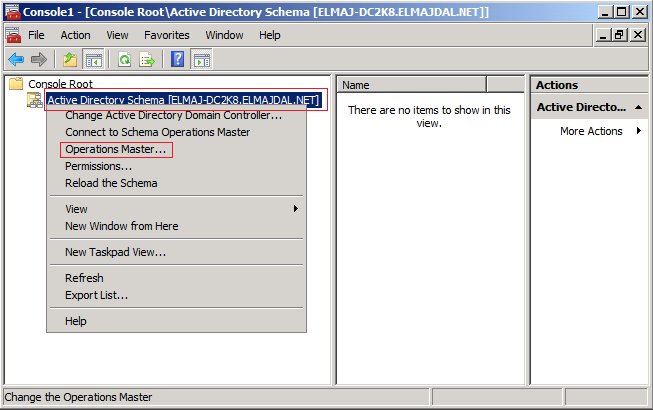
4.   Right click Active Directory Schema, then click Change Active Directory Domain Controller
5.  From the listed Domain Controllers, click on the domain controller that you want to be the schema master role holder and then click on OK
6.     In the console tree, right click Active Directory Schema [DomainController.DomainName], and then click 
 Operations Master.


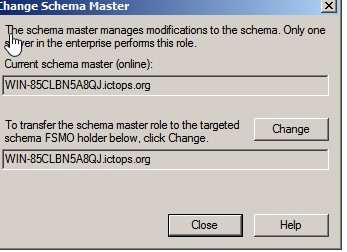
7.        On the Change Schema Master page, the current schema master role holder will be displayed ( eg:-  AD2K3.ictops.org and the targeted schema holder as well (eg :- WIN-85CLBN5A8QJ.ictops.org).
Once you click Change, the schema master holder will become WIN-85CLBN5A8QJ.ictops.org , click Change


                Transferring Domain Naming Master Role
                                         Using Active Directory Domains and Trusts snap-in to transfer the Domain Naming Master Role
Click Start > Administrative Tools > Active Directory Domains and Trusts
                   Same as transferring the Schema master role.
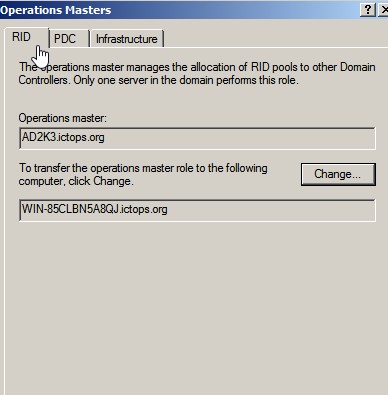
         Transferring RID Master, PDC Emulator, and Infrastructure Master Roles
                                 Using Active Directory Users and Computers snap-in to transfer the RID Master, PDC Emulator, and Infrastructure Master Roles

  1. Click Start > Administrative Tools > Active Directory Users and Computers > Right click
Active Directory Users and Computers, then click All Tasks > Operations Master.


2. You will have three Tabs, representing three FSMO roles (RID, PDC, Infrastructure). Click the Change button under each of these three tabs to transfer the roles.

Thursday, October 15, 2015

Run “sudo apt-get update” through Proxy In Ubuntu 14.04

                                       In some releases sudo is configured in such a way that all environment variables all cleared when running the command. To keep the value for your http_proxy and fix this, you need to edit /etc/sudoers,
Defaults env_keep = "http_proxy https_proxy ftp_proxy DISPLAY XAUTHORITY"
Note :- For modifying the /etc/sudoers, we need to set writable permission.but sometime after setting the Permission and Updating Proxy values (As mentioned above), it will shows some error like
Solve “sudo: /etc/sudoers.d is world writable”
                                      pkexec will use a different method of using root permissions, bypassing the issue.And the chmod will fix the permissions.
pkexec chmod 0440 /etc/sudoers

Thursday, October 1, 2015

Redmine :- Plugin Installation / Uninstallation and Reset the MYSQL ROOT Password

  1. Download compatible Plugins from repository
  2. Unarchive / Extract  plugin to folder redmine/plugins
               (/opt/redmine-3.1.1-0/apps/redmine/htdocs/plugins/)
     3.  Install plugin
$ cd /opt/redmine-3.1.1-0/
/opt/redmine-3.1.1-0/$ ./use_redmine
$ cd /opt/redmine-3.1.1-0/apps/redmine/htdocs/plugins
$bundle exec rake redmine:plugins NAME=progressive_projects_list RAILS_ENV=production                 
Uninstall Plugin On Redmine Server
  1. Install plugin
$ cd /opt/redmine-3.1.1-0/apps/redmine/htdocs/plugins
$rake redmine:plugins:migrate NAME=redmine_agile VERSION=0 RAILS_ENV=production
     2.  Remove the Plugins from directory
$ cd /opt/redmine-3.1.1-0/apps/redmine/htdocs/plugins
$rake redmine:plugins:migrate NAME=redmine_agile VERSION=0 RAILS_ENV=production
    Reset the MYSQL root Password in Bitnami Redmine
  1. Login into the server
  2. Change to the Redmine Installed directory
$cd /opt/redmine-3.1.1-0/mysql/bin/
$ ./mysqladmin -p -u root password

Redmine - Installation / Upgradation / Backup-Restore On Ubuntu 14.04

                        Redmine is a flexible project management web application. Written using Ruby on Rails framework, it is cross-platform and cross-database. Its main features are:
  1. Multiple projects support
  2. Flexible role based access control and Flexible issue tracking system 
  3. Gantt chart and calendar and News, documents and files management 
  4. Per project wiki and Per project forums and Simple time tracking functionality 
  5. Custom fields for issues, projects and users and SCM integration (SVN, CVS, Mercurial)
  6. Multiple LDAP authentication support and User self-registration support
    Bitnami Structure and Configuration
                                              The applications in Bitnami are installed in the 'apps' folder that you can find in the installation directory. In virtual machines, cloud images and in Bitnami Cloud hosting servers the installation directory is /opt/bitnami.
    The main folders that you can find inside 'apps/redmine' are the following:
    • conf: folder that includes the apache configuration files for redmine
    • htdocs: this folder includes the redmine files (Gemfile and Rakefile files, redmine configuration files, plugins folder, gems, etc).
    • The location of the redmine configuration files (database configuration, email settings, etc) is the 'apps/redmine/htdocs/config' folder.
    Start / Stop the Services On Redmine Server
                                                     Each Bitnami stack includes a control script that lets you easily stop, start and restart servers.The script is located at /opt/bitnami/ctlscript.sh or Installation Directory Which you are selected. Call it without any arguments to restart all services:                             
    $ sudo /opt/bitnami/ctlscript.sh start
                  OR
    $./ctlscript.sh start / stop /restart
    The same way use it to restart a specific service only by passing the service name as argument - eg:- mysql
                             $ sudo /opt/bitnami/ctlscript.sh restart mysql         
      Fresh Installation Of Bitnami Redmine On Ubuntu 14.04
    1. Download the latest stable versions from redmine.org      
    2. Copy the bitnami-redmine-3.1.1-0-linux-x64-installer.run package to Server
    3. Set executable permission
    $chmod +x bitnami-redmine-3.1.1-0-linux-x64-installer.run
        4. Install the bitnami redmine
    $./bitnami-redmine-3.1.1-0-linux-x64-installer.run
    Note :- During the installation time set the MYSQL root Password and Redmine admin user
                Backup And Restore Redmine
                                               Bitnami stacks are self-contained and the simplest option for performing a backup is to copy or compress the Bitnami stack installation directory. To do so in a safe manner, you will need to stop all servers, so this method may not be appropriate if you have people accessing the application continuously.
    Backup
    1. Stop All Services                
    ictops@ubuntu:~opt/redmine-3.1.1-0$./ctlscript.sh stop
        2.   Copy  all Contents from directory-FILES
    ictops@ubuntu:~opt/redmine-3.1.1-0/apps/redmine/htdocs/files$
        3.   Took Database backup Via SQLYOg or Command Line
    Restore :-
    1. Import the DB into the new server and modified the database.yml file
    2. Restore all files from which you are backed up into the new server directory named -FILES
    3. After Importing DB into the New server, need to migrate DB(Which is mentioned in the Upgradation steps)
    Upgrade Remine / Restore the Old Redmine Data and DB to New Redmine
                                   It is strongly recommended that you create a backup before starting the update process. If you have important data, it is advisable that you create and try to restore a backup to ensure that everything works properly.
                                  In the Redmine case, these are the steps to migrate the database from an old version to a new one.
    1. Login into the new Redmine Server
    2. Copy the database backup to the new Bitnami version server.
    3. Stop all servers and start only MySQL. Note that the installation directory could be different.
                 $ sudo /opt/redmine-3.1.1-0/ctlscript.sh stop
                $ sudo /opt/redmine-3.1.1-0/ctlscript.sh start mysql
    1. Remove the previous database and create the new one. You can configure the database user password with a secure password.
            /opt/redmine-3.1.1-0/mysql/bin/$ mysql -u root -p
    Password: ****
    mysql> drop database bitnami_redmine;
    mysql> create database bitnami_redmine;
    mysql> grant all privileges on bitnami_redmine.* to 'ictops_redmine'@'localhost' identified by 'DATABASE_PASSWORD'
    1. Restore the new database:
    $ mysql -u root -p bitnami_redmine < backup.sql
    1. Edit the Redmine configuration file to update the database user password (/opt/redmine-3.1.1-0/apps/redmine/htdocs/config/database.yml)
    production:
     adapter: mysql2
     database: bitnami_redmine
     host: localhost
     username: ictops_redmine
     password: "DATABASE_PASSWORD"
     encoding: utf8
    1. Migrate the database to the latest version:
    Note :- You should start the "Use Redmine" command prompt from the Windows Start Menu. On Linux or OS X, you should run this command from a "use_redmine" console.
    $ cd /opt/redmine-3.1.1-0/
    /opt/redmine-3.1.1-0/$ ./use_redmine
    $ cd /opt/redmine-3.1.1-0/apps/redmine/htdocs
    $ ruby bin/rake db:migrate RAILS_ENV=production

    Thursday, September 10, 2015

    SSH Passwordless Login Using SSH Keygen


    SSH Controller :-
    1. Create Key Using SSH keygen
                       administrator@IT-SVR-ANZLR:~$ssh-keygen -t rsa
    Note :- The above steps will create two key files on the server (private and public keys)
                                               id_rsa and id_rsa.pub
    2. Copy key to remote Server - sts009.ictops.in From SSH Controller
    Copy the Public key file (id_rsa.pub) from SSH Controller to remote server
                        administrator@IT-SVR-ANZLR:~$scp id_rsa.pub administrator@sts009.ictops.in:/home/administrator
                                          OR
                         administrator@IT-SVR-ANZLR:~$ssh-copy-id administrator@sts009.ictops.in
    Note :-The First command just copy the file into the remote server.
    Second command copy the files into the remote server in the home directory .ssh folder.If the folder in not present in the remote server
    Remote Server - sts009.ictops.in
    3. Login into the Server and Create a Directory in home location
                         administrator@AVCETTSTS009:~$ mkdir .ssh
    4. Copy the Public Key Contents into authorized_keys under .ssh directory
                         administrator@AVCETTSTS009:~$ cat id_rsa.pub >>~/.ssh/authorized_keys
                         administrator@AVCETTSTS009:~$ chmod 700 ~/.ssh/authorized_keys5. Login from SSH Controller to Remote Server Without Password
                         administrator@IT-SVR-ANZLR:~$ssh sts009.ictops.in
    bloggerwidgets