Wednesday, March 4, 2015

Run Tomcat 6/7 As tomcat Or Any Other User

                                      The default user and group are configured in /etc/default/tomcat.The file is format is show below
# Run Tomcat as this user ID. Not setting this or leaving it blank will use the
# default of tomcat7.
TOMCAT7_USER=tomcat7
# Run Tomcat as this group ID. Not setting this or leaving it blank will use
# the default of tomcat7.
TOMCAT7_GROUP=tomcat7
For Changing User Default User And Group In Tomcat:-
  1. Stop the tomcat service
  2. Editing the file /etc/default/tomcat7.Change the user and group in thi file
              (Add new user name instead of tomcat7)
  1. Change ownership of the folder /var/log/tomcat7 and /var/lib/tomcat7/webapps
            and all of it's files.
sudo chown -R newuser:newgroup /var/log/tomcat7
sudo chown -R newuser:newgroup /var/lib/tomcat7/webapps
sudo chown -R newuser:newgroup /var/log/tomcat7
     4. Optional :- Change ownership of the working folder
sudo chown newuser:newgroup /var/cache/tomcat7
sudo chown -R newuser:newgroup /var/cache/tomcat7/Catalina
     5. Make config files readable. Here you have two options:
Either add you new user to the tomcat7 group by:
sudo usermod -a -G tomcat7 newuser
          OR  change ownership of the config files:
sudo chown -R :newgroup /var/lib/tomcat7/conf/*
     6. Restarted the Server and Started the tomcat service

Monday, March 2, 2015

Command Line / Batch Script For Finding System Informations

For Username :-  whoami
For System Name :- hostname
For Computer Manufacturer :- systeminfo | findstr /c:"System Manufacturer"
For Computer Model :- systeminfo | findstr /c:"System Model"
       Make Batch File using With the above command
  1. Create a text file and saved as .bat extension
  2. Updated the text with the following command
whoami
hostname
systeminfo | findstr /c:"System Manufacturer"
systeminfo | findstr /c:"System Model"
pause

Sunday, March 1, 2015

Convert FAT32 To NTFS File System Without Losing Data

                                     Before you convert a Disk Drive from FAT32 File system to NTFS, you need to know the importance of the NTFS file system.NTFS file system has many advantages as compared to FAT File System below are the some listed advantage using NTFS.
  1. Allows indexing which improves file searching fast
  2. Better security – file encryption not available in Fat32
  3. Supports user's quota option
  4. File compression to save disk space on Hard Disk
  5. Supports larger files than FAT
                                          Once you convert a FAT32 partition to NTFS, you cannot simply convert it back to FAT32 with command line. You need to reformat this partition, of course, you will lose all data so make sure before doing any change take the backup.
  1. Open Command Prompt :- Start  ---> Run ---> cmd
  2. Follow the below mentioned Syntax
                        convert drive letter: /fs:ntfs
Eg :-     convert D:/fs:ntfs
Sample :-
C:\Users\ictops>convert D:/fs:ntfs
The type of the file system is FAT32.
Volume _ICTOPS created 3/1/2015 11:05 PM
Volume Serial Number is A024-4342
Windows is verifying files and folders...
File and folder verification is complete.
Windows has scanned the file system and found no problems.
No further action is required.
  15,616,992 KB total disk space.
           8 KB in 1 hidden files.
          72 KB in 2 files.
  15,616,904 KB are available.
       8,192 bytes in each allocation unit.
    1,952,124 total allocation units on disk.
    1,952,113 allocation units available on disk.
Determining disk space required for file system conversion...
Total disk space:              15633376 KB
Free space on volume:          15616904 KB
Space required for conversion:    81842 KB
Converting file system
Data error (cyclic redundancy check).

Thursday, February 12, 2015

Install MAC OS X Guest On Vmware Workstation/ESXi

                                       If you wish to run MAC OS X Guests via Desktop virtualization software VMware workstation or Server Virtualization Vmware ESXi , then the “VMware unlocker” is a compulsory utility to run Mac OS X guests. 
                                       This unlocker utility replaces few VMware program files to be able to install and run latest 10.10, 10.9 and older versions of Mac OS X guest virtual machines
  1. Power OFF all virtual machines and VMware workstation program.
  2. Download the Unlocker through the following link
http://www.insanelymac.com/forum/files/file/339-unlocker/
  1. Extract the downloaded file. The latest Unlocker is having patch for Windows, Linux, Fusion 4.0 on Snow Leopard and Lion and VMware ESXi 5
  2. In Vmware Workstation Select Windows Folder and install the patch
     Once it has successfully patched the VMware workstation 11, you should be able to see the Mac  
           OS X guest support as shown below
after unlocker 2.0.2
                                     
      5. In the Case of ESX/ESXi Upload the unlocker zip files to ESXi datastore or Copy to Server via SCP
      6. Take ESXi Support Console or use SSH via putty
      7. Use the unzip command to extract the files.(Reboot the host for the patches to become active)
      8. Ensure the contents of the esxi folder have execute permissions
chmod +x against the 3 files.
      9. Install Patches :- ./ install.sh
Eg:-  Installation Of Unlocker patches on to Vmware Esxi 5
1. Switched to Datastore and Listed items :-
# /vmfs/volumes/50e7090a-87ed9a0d-9b18-0026b95833b7 # ls
2. Switched to Unlocker Folder and Listed items :-
/vmfs/volumes/50e7090a-87ed9a0d-9b18-0026b95833b7 # cd unlock-all-v110/
/vmfs/volumes/50e7090a-87ed9a0d-9b18-0026b95833b7/unlock-all-v110 # ls
esxi             osx              src              unlock-all-v110
linux            readme.txt       tools
3. Switched to esxi Folder and Listed items :-
/vmfs/volumes/50e7090a-87ed9a0d-9b18-0026b95833b7/unlock-all-v110 # cd esxi/
/vmfs/volumes/50e7090a-87ed9a0d-9b18-0026b95833b7/unlock-all-v110/esxi # ls
Unlocker.ESXi           install.sh
Unlocker.ESXi.filepart  uninstall.sh
          4. Provide execute permissions of the esxi folder contents
                              chmod +x install.sh
                              chmod +x Unlocker.ESX
 
         5. Installed the patch :-
/vmfs/volumes/50e7090a-87ed9a0d-9b18-0026b95833b7/unlock-all-v110/esxi # ./install.sh
         6. Reboot the Esxi Host

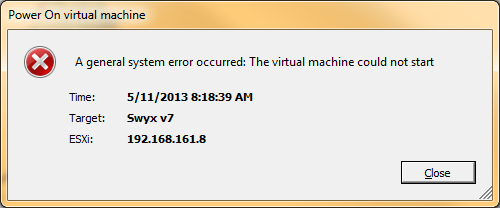
ESXi Standalone Host Cannot Power ON VM's


                                     We have a standalone Vmware ESXi host on ESXi 5.1. It currently has a handful of VMs powered on, and they are running fine.
If I try to power on any other VM - any VM at all -Also any one of the machine Power off and not able to start it again. I am receiving the following message:enter image description here
Solution :- Restart of the management agents.
                Gain SSH access to your standalone host and run: /sbin/services.sh restart 

Wednesday, February 11, 2015

Enable-Disable Secure Logon In Windows 8 (CTRL + ALT + DELETE)

                              Keeping your Windows 8 machine as secure as possible is important.There are many ways make this happen. You can choose to create a strong password also increase your security by regularly updating your system with the latest security patches and updates from Microsoft Online.
                             Using secure logon also provide additional layer of security for your systems.When this feature is enabled, it makes is much more difficult for programs such as (virus / spyware) to intercept or mimic your username and password to login.
  1. Open the Run dialog box :- Start ---> Run
  2. Type  :- netplwiz .You will get a Window like below
secure_logon_windows8_1
3. Select the ‘Advanced’ tab and check the box that says ‘Require users to press Ctrl + Alt + Delete’

Save Output Of Ping / Tracert Commands

                                       This is really very important and useful command specially when you have to observe long time Ping status of the network host.Easiest method to save the Ping status as a test file in your computer.
  1. Open Command Prompt (Start --> Run --->Type "CMD")
  2. In Command Prompt :-
ping 192.168.172.1  >c:\ping.txt
This will save the ping data to a text file in the drive C
                            The same way we can take the status of a tracert command on a text file
                        tracert 192.168.172.1 >c:\trace.txt
bloggerwidgets