Thursday, July 24, 2014

Add Google Analytics To Blogger

1. Add your BLOG to Google Analytics:
  • Go to the Google Analytics website https://www.google.co.in/analytics/
  • Log in to your Google Analytics account
  • In Google Analytics click on “Add Website Profile” under your current web-site.
  • Select “Add a Profile for a new domain” and then enter the URL (domain name) in text box next to where “http://” is listed (write it like “jaganponnus.blogspot.in”) and hit “Continue”
  • Highlight the tracking code and copy it to your clipboard
Two ways to integrate Google Analytics Tracking Code in Blogger
1. You can track traffic to your Blogspot domain on Blogger with Google Analytics.
  • Log in to your Blogger account.
  • Navigate to your blog's Settings > Other tab.
  • If you already have a Google Analytics account, simply enter your blog's Google Analytics Web Property ID (String like UA-000000-01)
  • Click Save to finish.
2. Adding Code Manually
  • Log in to your Blogger account.
  • Look for Template
  • Click Template
  • Select the 'Edit HTML' tab
  • Scroll to the bottom of the code.
  • Find the tag < /body>, which usually appears towards the end of the code in the template.
  • **Find the tag^ (closing head tag)
                    Copy and past the Analytics tracking code just above the tag< /body>
                    **Copy and paste Analytics tracking code, just before the closing tag^.
  • Click 'Save Template.

Search For emails by size in Gmail

To find emails larger than 5MB you can search for
                           size:5m or larger:5m or
To find emails sent over a year ago
                           older_than:1y.

Wednesday, July 23, 2014

Enable Auto Logon With Domain Computer

For this computer to perform automatic log on using domain credentials when powering on.
1. In Run :-  regedit
2. Navigate to the following registry key:
HKEY_LOCAL_MACHINE\SOFTWARE\Microsoft\Windows NT\CurrentVersion\Winlogon
3. Open the DefaultUserName entry, type the user name to log on with                               
4. Open the DefaultPassword entry, type the password for the user account under the value data box 
                                        If the DefaultUserName and DefaultPassword registry value name is not found, create a new String Value (REG_SZ) with value name as DefaultUserNameIf or DefaultPassword value
5. Open the 'DefaultDomainName' key and set the value to your domain name (or the computers name if using a local account)
6. Open the AutoAdminLogon entry, type 1 in the Value Data box
7. Quit Registry Editor.
Eg:-
HKEY_LOCAL_MACHINE\SOFTWARE\Microsoft\WindowsNT\CurrentVersion\Winlogon
AutoAdminLogon = 1
ForceAutoLogon = 1
DefaultUserName = domainname/username
DefaultPassword = password

Tuesday, July 22, 2014

Enable Directory Listing In Nginx

                                                 Enabling directory listing in a folder in nginx is simple enough with just an autoindex on; directive inside the location directive. You can also enable sitewide directory listing by putting it in the server block or even enable directory access for all sites by putting it in the http block.
Eg : -
server {
       listen   80;
       server_name  domain.com www.domain.com;
       access_log  /var/...........................;
       root   /path/to/root;
       location / {
               index  index.php index.html index.htm;
       }
       location /somedir {
              autoindex on;
       }
}

Disable Directory Listings in Apache

1. Navigate to your Apache config file (httpd.conf)
2. Edit the config file vi httpd.conf or /etc/apache2/sites-enabled# vi 000-default
                                     Search for the directory section of the file where your website resides, and the Options keyword beneath that. It should look something like:                        
                                   Options Indexes                         
Update the option 'Indexes' from the above, so the line would read instead:
                                  Options -Indexes

Saturday, July 19, 2014

Time Synchronisation With NTP In Ubuntu

Install the NTP daemon :   sudo apt-get install ntp
Stop the NTP service :       sudo /etc/init.d/ntp stop
Set your timezone :           sudo dpkg-reconfigure tzdata
Set the local time to the time provided by the specified time server
                                         sudo ntpdate 0.de.pool.ntp.org
Edit the config file if you want to change the default time server addresses
                                         sudo mcedit /etc/ntp.conf
Start the NTP server :      sudo /etc/init.d/ntp start
Test NTP status :              sudo ntpq -p

Monday, July 14, 2014

Connect/Mount An iSCSI Volume On Ubuntu Server 14.04

          Ubuntu Linux Connect to an iSCSI Volume
                                     iSCSI Initiator : iSCSI (Internet Small Computer System Interface) is a protocol that allows SCSI commands to be transmitted over a network. Typically iSCSI is implemented in a SAN (Storage Area Network) to allow servers to access a large store of hard drive space. The iSCSI protocol refers to clients as initiators and iSCSI servers as targets.
Dell-SAN Storage      Management IP : 192.168.254.81     Storage IP :-  20.1.20.20
Volume Name : Jagan-Test      
                                      
Ubuntu Server :- iSCSI Initiator  eth0 IP : 10.3.3.85   Add Additional IP on eth1 :  20.1.20.35
InitiatorName=iqn.1993-08.org.debian:01:83201076dec4
In Dell Storage :
1. Access the storage via management IP
2. Create a Volume “ Jagan-Test ”
3. Add An Access Policy in Jagan-Test for discovering the Volume from Ubuntu Server

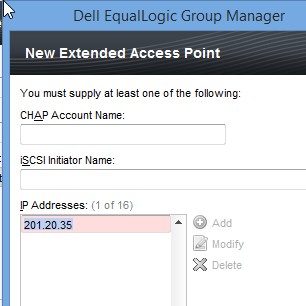
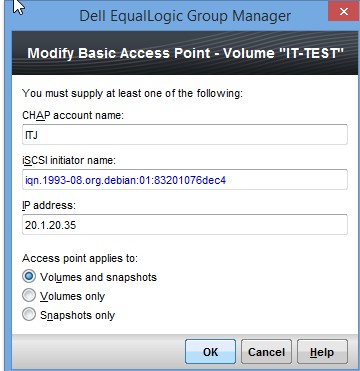
4. Add Basic Access Point : Here Set Initiator Name of the Ubuntu Server “ iiqn.1993-08.org.debian:01:83201076dec4” and IP “ 20.1.20.35 “
In Ubuntu Server :
iSCSI Initiator Install : iSCSI initiator install the open-iscsi package
sudo apt-get install open-iscsi
iSCSI Initiator Configuration
Edit /etc/iscsi/iscsid.conf changing the following:
    vi /etc/iscsi/iscsid.conf
node.startup = automatic  (Uncomment the Line)
#node.startup = manual
Check the Default  Initiator Name
    vi /etc/iscsi/initiatorname.iscsi
        InitiatorName=iqn.1993-08.org.debian:01:3f9fbbc38058
Check which Targets are available by using the iscsiadm utility
sudo iscsiadm -m discovery -t st -p
-m: determines the mode that iscsiadm executes in.
-t: specifies the type of discovery.
-p: option indicates the target IP address.
Example :
iscsiadm -m discovery -t st -p 20.1.20.20
20.1.20.20:3260,1 iqn.2001-05.com.equallogic:0-af1ff6-d93dee2cf-7a4816d61f6538c5-avctest
The iqn number and IP address above will vary depending on your hardware.
Connect to the iSCSI target :
root@ubuntu:/etc/iscsi# iscsiadm -m node --login
Logging in to [iface: default, target: iqn.2001-05.com.equallogic:0-af1ff6-855dee2cf-906006b8186568f5-it-test, portal: 20.1.20.20,3260] (multiple)
Login to [iface: default, target: iqn.2001-05.com.equallogic:0-af1ff6-855dee2cf-906006b8186568f5-it-test, portal: 20.1.20.20,3260] successful.
Check the Disk  Status
root@ubuntu:/etc/iscsi# fdisk -l
Device Boot      Start         End      Blocks   Id  System
/dev/xvda1            2048      499711      248832   83  Linux
/dev/xvda2          501758    16775167     8136705    5  Extended
/dev/xvda5          501760    16775167     8136704   8e  Linux LVM
Disk /dev/sda doesn't contain a valid partition table
Make sure that the new disk has been detected using dmesg:
root@ubuntu:/etc/iscsi# dmesg | grep sd
[ 1946.335705] sd 2:0:0:0: Attached scsi generic sg1 type 0
[ 1946.340459] sd 2:0:0:0: [sda] 2147512320 512-byte logical blocks: (1.09 TB/1.00 TiB)
[ 1946.342936] sd 2:0:0:0: [sda] Write Protect is off
[ 1946.342940] sd 2:0:0:0: [sda] Mode Sense: 81 00 00 00
[ 1946.343449] sd 2:0:0:0: [sda] Write cache: disabled, read cache: enabled, doesn't support DPO or FUA
[ 1946.348980]  sda: unknown partition table
[ 1946.352281] sd 2:0:0:0: [sda] Attached SCSI disk
Create a Partition in new iSCSI disk
root@ubuntu:/# fdisk /dev/sda
n - New Partition
p - Primary
w - Save
Format the file system and Mount it in to /cluster-storage  
root@ubuntu:/etc/iscsi# mkfs.ext4 /dev/sda1
root@ubuntu:/# mkdir cluster-storage
root@ubuntu:/# mount /dev/sda1 /cluster-storage/
root@ubuntu:/# mount -a
root@ubuntu:/#mount
Check the HDD Usage Status :
Filesystem                   Size  Used Avail Use% Mounted on
/dev/mapper/ubuntu--vg-root   12G  1.2G  9.5G  11% /
none                         4.0K     0  4.0K   0% /sys/fs/cgroup
udev                         2.0G  4.0K  2.0G   1% /dev
tmpfs                        395M  404K  395M   1% /run
none                         5.0M     0  5.0M   0% /run/lock
none                         2.0G     0  2.0G   0% /run/shm
none                         100M     0  100M   0% /run/user
/dev/xvda1                   236M   37M  188M  17% /boot
/dev/sda1                    9.8G   23M  9.2G   1% /cluster-storage
Mount the iSCSI drive during boot:
root@ubuntu:/# vi /etc/fstab
/dev/sda1/cluster-storage ocfs2 _netdev 0 0

Thursday, July 10, 2014

Kill Application In Ubuntu

Find the PID of the application you want to kill :
                   ps aux | grep "$appName" | grep -v 'grep'
Then use kill.(Ensure you have the privilege to kill it.)

                   kill "$PID"

Clear IE History Via Batch File

1. Open Notepad
2. Paste the below mentioned command into Notepad
3. Save the file as .bat (eg :- it.bat)

Temporary Internet Files
RunDll32.exe InetCpl.cpl,ClearMyTracksByProcess 8

Cookies
RunDll32.exe InetCpl.cpl,ClearMyTracksByProcess 2
History
RunDll32.exe InetCpl.cpl,ClearMyTracksByProcess 1
Form Data
RunDll32.exe InetCpl.cpl,ClearMyTracksByProcess 16
Passwords
RunDll32.exe InetCpl.cpl,ClearMyTracksByProcess 32
Delete All
RunDll32.exe InetCpl.cpl,ClearMyTracksByProcess 255
Delete All – "Also delete files and settings stored by add-ons"
RunDll32.exe InetCpl.cpl,ClearMyTracksByProcess 4351

Clear Chrome Temp Data (History/Cookies/Cache) In Windows 7

1. Open Notepad
2. Paste the below mentioned command into Notepad
3. Save the file as .bat (eg :- it.bat)
CECHO --------------------------------------
ECHO **** Clearing Chrome cache
taskkill /F /IM "chrome.exe">nul 2>&1

set ChromeDir=C:\Users\%USERNAME%\AppData\Local\Google\Chrome\User Data
del /q /s /f "%ChromeDir%"
rd /s /q "%ChromeDir%"

Tuesday, July 1, 2014

Set Up MySQL Master-Master Replication

                                        MySQL Master-Master replication allows data to be copied from either server to the other one. This subtle but important difference allows us to perform mysql read or writes from either server. This configuration adds redundancy and increases efficiency when dealing with accessing the data.
                                    This article will be based on two VPS, named Master -1 and Master -2.
Master - 1 = 10.3.3.95
Master - 2 = 10.3.3.96
1. Install and Configure MySQL on Master - 1
sudo apt-get install mysql-server mysql-client
2. Modify the MYSQL Parameters
vi /etc/mysql/my.cnf
                 There are four lines that we need to change, which are currently set to the following:
server-id               = 1
log_bin                 = /var/log/mysql/mysql-bin.log
binlog_do_db            = aview
# bind-address            = 127.0.0.1
Restart  MYSQL : sudo service mysql restart
3. Configuration In MYSQL
mysql -u root -p
mysql>create user 'replicator'@'%' identified by 'amma';
mysql>grant replication slave on *.* to 'replicator'@'%';
mysql>show master status;
+------------------+----------+--------------+------------------+
| File             | Position | Binlog_Do_DB | Binlog_Ignore_DB |
+------------------+----------+--------------+------------------+
| mysql-bin.000001 |      107 | aview      |                  |
+------------------+----------+--------------+------------------+
1 row in set (0.00 sec)
4. Install and Configure MySQL on Master - 2
sudo apt-get install mysql-server mysql-client
5. Modify the MYSQL Parameters
vi /etc/mysql/my.cnf
                 There are four lines that we need to change, which are currently set to the following:
server-id               = 2
log_bin                 = /var/log/mysql/mysql-bin.log
binlog_do_db            = aview
# bind-address            = 127.0.0.1
Restart  MYSQL : sudo service mysql restart
6. Configuration In MYSQL
mysql -u root -p
mysql>create user 'replicator'@'%' identified by 'amma';
mysql>grant replication slave on *.* to 'replicator'@'%';
mysql>show master status;
+------------------+----------+--------------+------------------+
| File             | Position | Binlog_Do_DB | Binlog_Ignore_DB |
+------------------+----------+--------------+------------------+
| mysql-bin.000004 |      107 | aview      |                  |
+------------------+----------+--------------+------------------+
1 row in set (0.00 sec)
7. Replication Configuration In Master - 2
mysql>
slave stop;
CHANGE MASTER TO MASTER_HOST = '10.3.3.95', MASTER_USER = 'replicator', MASTER_PASSWORD = 'amma', MASTER_LOG_FILE = 'mysql-bin.000001', MASTER_LOG_POS = 107;
slave start;
8. Replication Configuration In Master - 1
mysql>
slave stop;
CHANGE MASTER TO MASTER_HOST = '10.3.3.96', MASTER_USER = 'replicator', MASTER_PASSWORD = 'amma', MASTER_LOG_FILE = 'mysql-bin.000002', MASTER_LOG_POS = 107;
slave start;
9. Check the Status In Both Master - 1 and Master - 2
mysql>SHOW SLAVE STATUS\G;
If there is an issue in connecting, you can try starting slave with a command to skip over it:
mysql>SET GLOBAL SQL_SLAVE_SKIP_COUNTER = 1; SLAVE START;
10. Testing Dump aview DB in to Master -1 via SQLYOG, it automatically reflected it in to the Master - 2.
      If u delete any tables from Master - 2, the table is also deleted from Master - 1
Verification Master - 1
mysql>  SHOW SLAVE STATUS\G;
*************************** 1. row ***************************           
Slave_IO_State: Waiting for master to send event
Master_Host: 10.3.3.96
Master_User: replicator
Master_Port: 3306
Connect_Retry: 60
Master_Log_File: mysql-bin.000005
Read_Master_Log_Pos: 100977
Relay_Log_File: mysqld-relay-bin.000014
Relay_Log_Pos: 101123
Relay_Master_Log_File: mysql-bin.000005
Slave_IO_Running: Yes
Slave_SQL_Running: Yes
Replicate_Do_DB:
Replicate_Ignore_DB:
Replicate_Do_Table:
Replicate_Ignore_Table:
Replicate_Wild_Do_Table:
Replicate_Wild_Ignore_Table:
Last_Errno: 0
Last_Error:
Skip_Counter: 0
Exec_Master_Log_Pos: 100977
Relay_Log_Space: 101426
Until_Condition: None
Until_Log_File:
Until_Log_Pos: 0
Master_SSL_Allowed: No
Master_SSL_CA_File:
Master_SSL_CA_Path:
Master_SSL_Cert:
Master_SSL_Cipher:
Master_SSL_Key:
Seconds_Behind_Master: 0
Master_SSL_Verify_Server_Cert: No
Last_IO_Errno: 0
Last_IO_Error:
Last_SQL_Errno: 0
Last_SQL_Error:
Replicate_Ignore_Server_Ids:
Master_Server_Id: 2
1 row in set (0.00 sec)
ERROR:
No query specified
Verification Master - 2
mysql> SHOW SLAVE STATUS\G;
*************************** 1. row ***************************           
Slave_IO_State: Waiting for master to send event
Master_Host: 10.3.3.95
Master_User: replicator
Master_Port: 3306
Connect_Retry: 60
Master_Log_File: mysql-bin.000004
Read_Master_Log_Pos: 219
Relay_Log_File: mysqld-relay-bin.000011
Relay_Log_Pos: 365
Relay_Master_Log_File: mysql-bin.000004
Slave_IO_Running: Yes
Slave_SQL_Running: Yes
Replicate_Do_DB:
Replicate_Ignore_DB:
Replicate_Do_Table:
Replicate_Ignore_Table:
Replicate_Wild_Do_Table:
Replicate_Wild_Ignore_Table:
Last_Errno: 0
Last_Error:
Skip_Counter: 0
Exec_Master_Log_Pos: 219
Relay_Log_Space: 668
Until_Condition: None
Until_Log_File:
Until_Log_Pos: 0
Master_SSL_Allowed: No
Master_SSL_CA_File:
Master_SSL_CA_Path:
Master_SSL_Cert:
Master_SSL_Cipher:
Master_SSL_Key:
Seconds_Behind_Master: 0
Master_SSL_Verify_Server_Cert: No
Last_IO_Errno: 0
Last_IO_Error:
Last_SQL_Errno: 0
Last_SQL_Error:
Replicate_Ignore_Server_Ids:
Master_Server_Id: 1
1 row in set (0.00 sec)
ERROR:
No query specified
bloggerwidgets